Machine learning and A.I have been growing exponentially in recent years. In fact, they have been growing so much that in January 2018, Google CEO Sundar Pichai said that artificial intelligence will be more transformative for humanity than even the advent of electricity and fire (bloomberg.com/news/articles/2020-01-22/google-ceo-thinks-ai-is-more-profound-than-fire). That is big! As machine learning becomes more prevalent in the world, it is becoming more vital for data scientists and enthusiasts alike to learn about all the models they can, especially Support Vector Machines, for their wide use cases.
What is a Support Vector Machine?
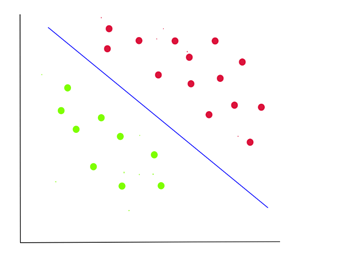
A Support Vector Machine (SVM) is simply a classification algorithm that can divide between labelled data points. Its goal is to draw boundaries based on previously inputted data on a feature space that can then be used to generalize predictions for test data. The math behind it is much more complex, but generally, it finds optimal boundaries that maximize the distance between clusters of data points. It can generalize to feature spaces of any dimensions and can be used to draw non-linear boundaries as well.
When are Support Vector Machines Useful?
Support Vector Machines are particularly useful whenever we need to classify data with large amounts of features and have small data sets. More features give the SVM more information to classify data, and small data sets are preferred for Support Vector Machines because they can be computationally expensive depending on how they are implemented. Other advantages of Support Vector Machines are the lack of a massive amount of hyperparameters like neural networks have, the ability to not simply give a classification but to give a maximum margin classification, and relatively efficient non-linear classification. Some examples of where SVMs are used include text classification and image classification.
Implementing an SVM in Scikit-Learn and Python
How can we implement a support vector machine, you ask? Using Python and the Scikit- Learn library, it is surprisingly easy to implement one and use one for your own data. I suggest you use Google Collaboratory or Jupyter Notebooks to follow along because of how easy it is to set up and use. If you choose to do it directly on your pc, to install Scikit-Learn go here (https://scikit-learn.org/stable/install.html).
For this application, we are going to be using an SVM to make a model that can classify handwritten 8 by 8 pixels digits.
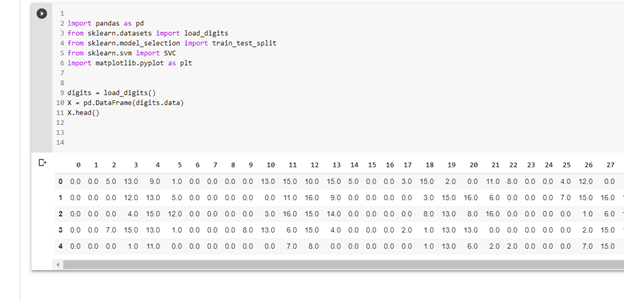
First, we must import all the required libraries to handle our data, to split our data, to actually make the SVM model, and to visualize our results. For that, we will import the following libraries
import pandas as pd
from sklearn.datasets import load_digits
from sklearn.model_selection import train_test_split
from sklearn.svm import SVC
import matplotlib.pyplot as plt
You will see what these imports will do as we go along. Now, we actually have to load our digits data in so we say
digits = load_digits()
If we print the values digits stores, by running print(dir(digits)), we can see the following

Because we only want the pixel values of our images in an easy to read fashion for now, we will simply write
X = pd.DataFrame(digits.data)
Looking at the first few elements by writing X.head(),we can see our data easily organized by sample number and a list of all their pixel values in the image.
To break our data into testing and training sets, we call train_test_split(X,digits.target, test_size = 0.2) where X represents our data, digits.target represents the corresponding labels, and test_size represents the percentage of data we want to be testing samples (in this case 20%).
X_Train, X_Test, Y_Train, Y_Test = train_test_split(X,digits.target,test_size = 0.2)
Now that our data is ready, we simply create a model, we fit it on our training data, and we test it. It’s that simple!
model = SVC()
model.fit(X_Train, Y_Train)
model.score(X_Test, Y_Test)
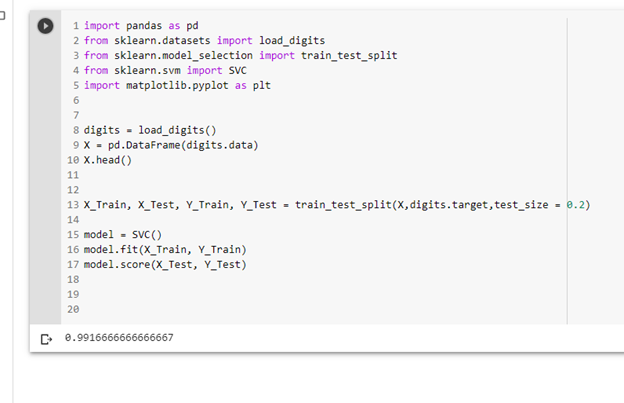
Seeing our score, we can see that we got 99.17% accuracy, which is amazing. This is because we had data with relatively large margins and with a good amount of features and samples to deal with.
If we try visualizing our results with sample data, we can see the model performing well.
sample_index = 17
print(model.predict(X)[sample_index])
plt.imshow(digits.images[sample_index])

As you can see, the SVM can be a potent tool as it is given certain data constraints than a neural network and can oftentimes be a faster option. To run your own data, simply convert it into a DataFrame, and the same methodology can be followed to apply SVM on it.
If you enjoyed this post, consider subscribing to this amazing blog by Ashutosh Tripathi, and also checking out my blog https://byteofmath.com where I talk more about support vector machines and other related CS-concepts. Stay safe and thank you!
Full Code
import pandas as pd
from sklearn.datasets import load_digits
from sklearn.model_selection import train_test_split
from sklearn.svm import SVC
import matplotlib.pyplot as plt
digits = load_digits()
print(dir(digits))
X = pd.DataFrame(digits.data)
X_Train, X_Test, Y_Train, Y_Test = train_test_split(X,digits.target,test_size = 0.2)
model = SVC()
model.fit(X_Train, Y_Train)
model.score(X_Test, Y_Test)
sample_index = 17
print(model.predict(X)[sample_index])
plt.imshow(digits.images[sample_index])
Author: Manu Gupta
I am a hobbyist who loves coding and math! My fields of interest specifically related to machine learning, web development, game development, and all things math! My favourite language is Python, though I do occasionally use Java here and there.
