What is Spacy
spaCy is an open-source Python library that parses and “understands” large volumes of text.
(You can download the complete Notebook from here.)
- spaCy is the best way to prepare text for deep learning.
- It interoperates seamlessly with TensorFlow, PyTorch, scikit-learn, Gensim and the rest of Python’s awesome AI ecosystem.
- With spaCy, you can easily construct linguistically sophisticated statistical models for a variety of NLP problems.
- spaCy excels at large-scale information extraction tasks.
- It’s written from the ground up in carefully memory-managed Cython.
- Independent research in 2015 found spaCy to be the fastest in the world.
- If your application needs to process entire web dumps, spaCy is the library you want to be using.
- spaCy is designed to help you do real work — to build real products, or gather real insights.
- The library respects your time, and tries to avoid wasting it.
- It’s easy to install, and its API is simple and productive.
Reference and for more details, refer (https://spacy.io/)
Installation and Setup
1. Using Python 3.3+ venv module
Create the virtual environment first
Open Command Prompt and navigate to the directory where you want to create the project

Check where Python is installed and which version

Create and Activate Python Virtual Environment venv available from python version 3.3+

Installing Jupyter inside the venv


Installing spacy inside the venv


Installing ipykernel inside the venv

Attaching venv to kernel in jupyter notebook
Jupyter Notebook makes sure that the IPython kernel is available, but you have to manually add a kernel with a different version of Python or a virtual environment. First, you need to activate your virtual environment. Next, install ipykernel which provides the IPython kernel for Jupyter:

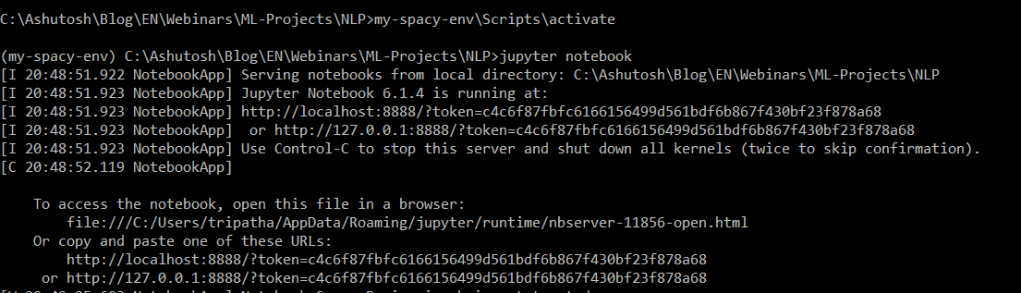
Open Jupyter Notebook from command prompt
2. Using conda environment package manager
Create the virtual environment first
conda create -n spacyenv python=3
See the list of env available including the newly created spacyenv
conda info -e
Activate the env
conda activate spacyenv
Jupyter Notebook makes sure that the IPython kernel is available, but you have to manually add a kernel with a different version of Python or a virtual environment. First, you need to activate your virtual environment. Next, install ipykernel which provides the IPython kernel for Jupyter:
pip install --user ipykernel
Now, add your virtual environment to Jupyter
python -m ipykernel install --user --name=spacyenv
Now your env is created and added to jupyter notebook. Now to Install Spacy we have two options
1. From the command line or terminal:
conda install -c conda-forge spacy
orpip install -U spacy
2. From Jupyter Notebook
Start the Jupyter Notebook from command line by typing
jupyter notebook
Now Install Spacy by typing and executing
!pip install -U spacy
Now download the language specific model. I will download the model for english langauge as below.
(you must run this as admin or use sudo)
From command line
python -m spacy download en
from jupyter notebook
!python -m spacy download en
If successful, you should see a message like:
Linking successfulC:\Anaconda3\envs\spacyenv\lib\site-packages\en_core_web_sm -->C:\Anaconda3\envs\spacyenv\lib\site-packages\spacy\data\enYou can now load the model via spacy.load('en')
Some basic operations to check if everything installed correctly
- This is a typical set of instructions for importing and working with spaCy.
- Don’t worry, if it takes time – spaCy has large library to load:
#Import spaCy and load the language library
import spacy
nlp = spacy.load('en_core_web_sm')
#Create a Doc object
doc = nlp(u'Corona will go very soon. Do not get panic, maintain social distancing and follow the instructions. Cases in U.S. have reduced in last 48 hours')

#Print each token separately
for token in doc:
    print(token.text, token.pos_, token.dep_)
Output
Corona PROPN nsubj
will VERB aux
go VERB ROOT
very ADV advmod
soon ADV advmod
. PUNCT punct
Do VERB aux
not ADV neg
get VERB ROOT
panic NOUN dobj
, PUNCT punct
maintain VERB conj
social ADJ amod
distancing NOUN dobj
and CCONJ cc
follow VERB conj
the DET det
instructions NOUN dobj
. PUNCT punct
Cases NOUN nsubj
in ADP prep
U.S. PROPN pobj
have VERB aux
reduced VERB ROOT
in ADP prep
last ADJ amod
48 NUM nummod
hours NOUN pobj
We can apply some formating on how the output is printed. However for now observe few things as below:
- Corona is recognized as a Proper Noun, not just a word at the start of a sentence.
- U.S. is kept together as one entity (It is called ‘token’)
Later we will also see what each of these abbreviations mean and how they’re derived.
Pipeline
When we run nlp, our text enters a processing pipeline that first breaks down the text and then performs a series of operations to tag, parse and describe the data. Image source: https://spacy.io/usage/spacy-101#pipelines
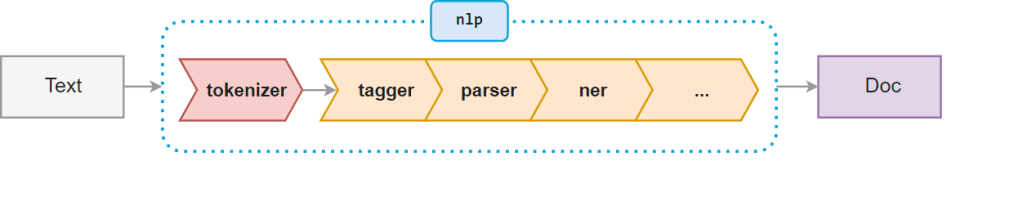
We can see what operations are inside the pipeline using the code below.
nlp.pipeline

Tokenization
- The first step in processing text is to split up all the component parts (words & punctuation) into “tokens”.
- These tokens are annotated inside the Doc object to contain descriptive information.
doc2 = nlp("Apple is looking at buying U.K. startup for $1 billion")
for token in doc2:
    print(token.text, token.pos_, token.dep_)

doc3 = nlp("Apple isn't looking at buying U.K. startup.")
for token in doc3:
    print(token.text, token.pos_, token.dep_)

- Notice how
isn'thas been split into two tokens. - spaCy recognizes both the root verb
isand the negation attached to it. - Notice also that both the extended white space and the period at the end of the sentence are assigned their own tokens.
Doc3 also contains the original text. You can see it by executing the doc3 object.

Part-of-Speech Tagging (POS)
- The next step after splitting the text up into tokens is to assign parts of speech.
- In the above example,
Applewas recognized to be a proper noun. Here some statistical modeling is required. - For example, words that follow “the” are typically nouns.
For a full list of POS Tags visit https://spacy.io/api/annotation#pos-tagging
doc4 = nlp(u"Apple isn't looking at buying U.K. startup.")
for token in doc4:
    print(token.text, token.pos_)

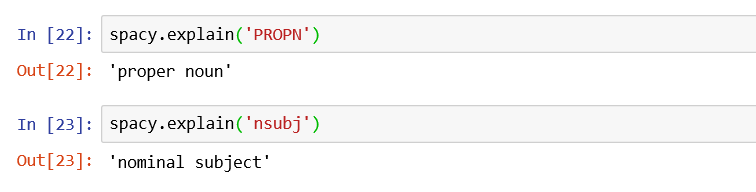
To see the full name of a tag use spacy.explain(tag)
Other Important information which spaCy assign to tokens.
Will cover all these in detail in next articles under NLP spaCy Series.
| Tag | Description | doc4[0].tag |
|---|---|---|
.text | The original word text | Apple |
.lemma_ | The base form of the word | Apple |
.pos_ | The simple part-of-speech tag | PROPN/proper noun |
.tag_ | The detailed part-of-speech tag | NNP/noun, proper singular |
.shape_ | The word shape – capitalization, punctuation, digits | Xxxxx |
.is_alpha | Is the token an alpha character? | True |
.is_stop | Is the token part of a stop list, i.e. the most common words of the language? | False |
Span (Slicing)
doc5 = nlp(u"Apple isn't looking at buying U.K. startup.")
sliced_text = doc5[4:7]
sliced_text

Sentences
Print sentence tokens instead of word tokens.
doc6 = nlp(u'This is the first sentence. This is another sentence. This is the last sentence.')
for sent in doc6.sents:
    print(sent)

Note:
This article is “Article 1” under the NLP spaCy Series of articles
Here, I have covered the installation of spaCy and its basic operations.
Next article, I will be covering the text pre-processing steps in detail using spaCy.

6 comments