In this post, we will build an application using flask which will predict the house price based on the parameters influencing the house price. Later you can customize it for any model GUI designing. We will be using Flask which is widely used web framework for Machine Learning model deployment. There are other frameworks as well coming in the market like FastAPI but till today, flask is still the widely used and trusted framework over the machine learning community for model deployment.
After reading this post, you will be familiar with the following key things with respect to Machine Learning Model Deployment using Flask.
- What is Flask and its Components
- Create Flask Project Directory Structure
- How to Create Python Virtual Environment?
- Install libraries
- Create a home page to print a welcome message send from server side flask app
- Get Bootstrap for styling the web pages and Jquery for ajax requests
- Design the layout
- Design the user input form page to get input from users to predict the house price
- Create an Ajax Request to send the form data to flask app
- load linear model build and saved in system
- Create api end point for prediction of the house price
- Analyze the prediction output
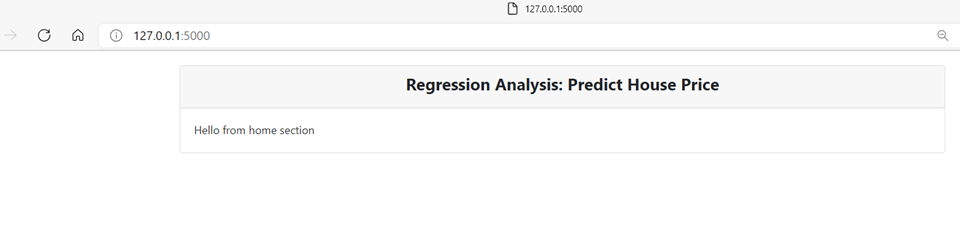
This is the application screenshot which we are going to develop in this post.

What is Flask and its components?
Flask is a web application framework written in Python. Flask is based on Werkzeug WSGI toolkit and Jinja2 template engine. Flask is often referred to as a micro framework. It aims to keep the core of an application simple yet extensible.
Web Server Gateway Interface (WSGI) has been adopted as a standard for Python web application development. WSGI is a specification for a universal interface between the web server and the web applications.
Werkzeug is a WSGI toolkit, which implements requests, response objects, and other utility functions. This enables building a web framework on top of it. The Flask framework uses Werkzeug as one of its bases.
Jinja2 is a popular templating engine for Python. A web templating system combines a template with a certain data source to render dynamic web pages.
Create Flask Project Directory Structure
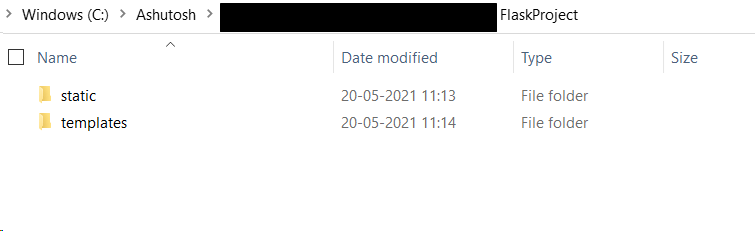
goto the directory where you want to save the project. There you create a parent folder as FlaskProject. Inside FlaskProject folder create the following sub folders. And follow the naming as it is for these two sub folders. See they are all in lowercase and templates end with s.
- static
- templates
This will make your initial project directory setup. It will look like below image:
Now open the VS Code IDE (you can use pycharm or any other IDE of your choice. Steps will be same).
If you are new to VS Code, then you can refer my previous article on How to install VS Code on Windows Once you are done with installation you can follow the next steps.
you can type VS Code on start menu and then open it. Once it opens, click on the file menu at the top and open the FlaskProject folder we created in previous step.


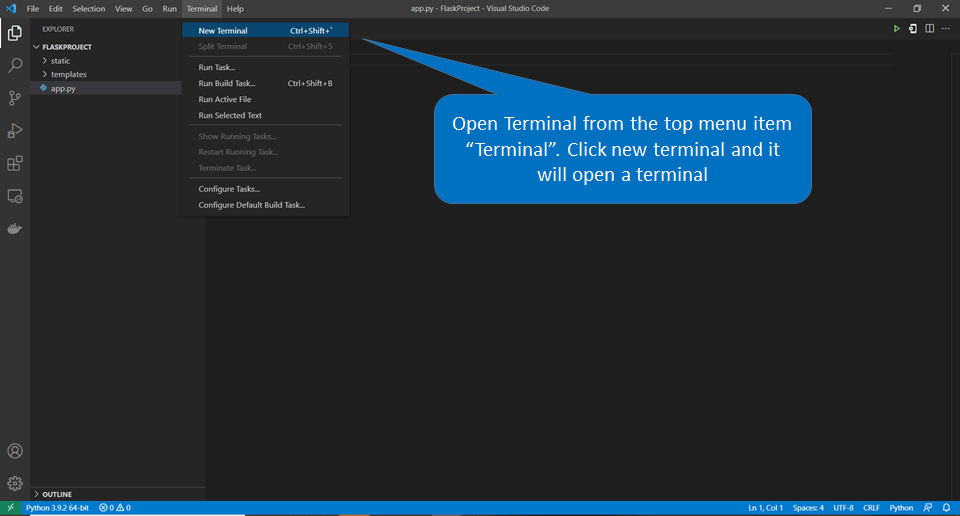
Once you are done till here, now we will create an app.py python file to write your server side code. It will have all your API end points defined. So click on first plus icon as shown in the above image to create a file named app.py under the FlaskProject folder not under the sub folders.

Once you create app.py it will look like below:

Now you see it is a blank file. So to use Flask, we need to import the Flask Library but before that it should be installed. So it is the best practice to use the virtual environment instead installing everything at system level. So will create the python virtual environment and the install all required libraries, frameworks inside that.
How to Create Python Virtual Environment
Open the terminal from the top menu items.
Make sure Python is installed, else install python using the step by step guide on python installation.
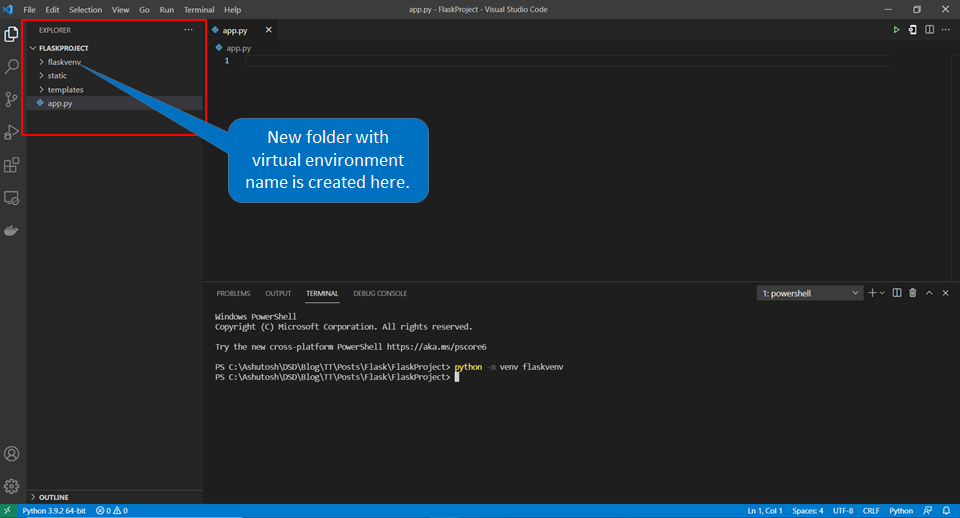
In the terminal make sure you are in the correct folder else use cd command to navigate to the right folder. Then type “python -m venv environmentName” in the terminal and hit enter. It will create virtual environment in the same directory. You can see a new folder with the name of virtual env must be created inside the FlaskProject folder.
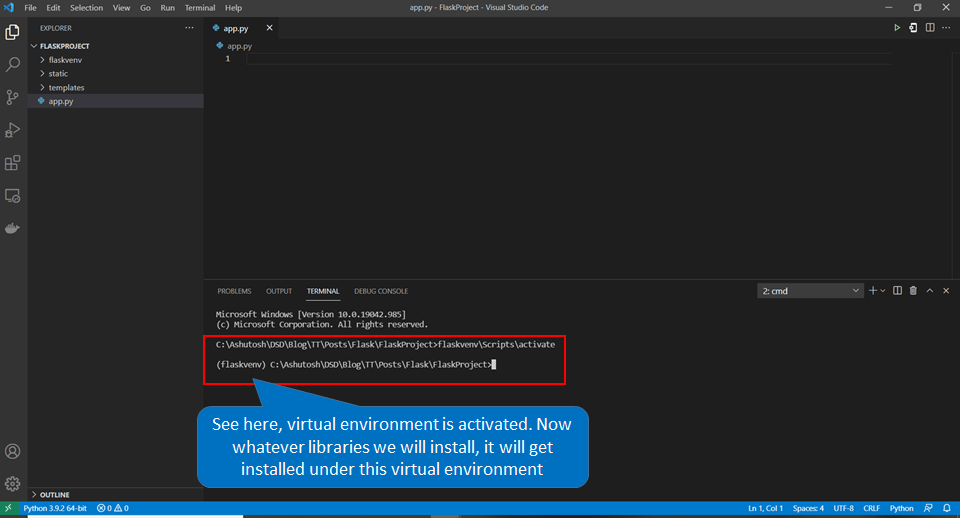
Now Activate the virtual environment using “\yourVenvName\Scripts\Activate” as below:
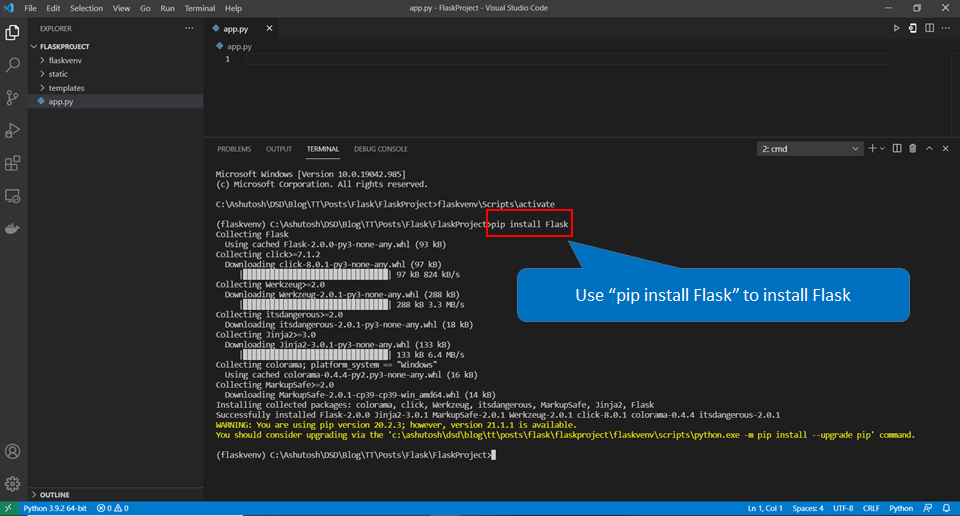
Install libraries
Use pip command to install Flask as
pip install Flask
Similarly will install other libraries and packages like pandas, numpy, sklearn to work with model. Pickle with by default come with python.
After then will import Flask to our application app.py file.

Create a home page to print a welcome message send from server side flask app
before you define any route in app.py file make sure to initialize the app and make sure to run the app in debug mode as below:

Next create a route to home page which will display the welcome message.

Till now we have not created any templates mean html pages to render. Now as you see from the route above we are returning home.html so this html page should exist else it will give error on run.
Let’s create the home.html page inside templates folder now.

Now its time to run the application and see the output in the browser.

Now in the browser you will see the message printed.

Here you see a plain message with no styling at all. Now in next steps will see how to use the bootstrap css and jquery libraries to give style to the page.
Get Bootstrap for styling the web pages and JQuery for Ajax requests
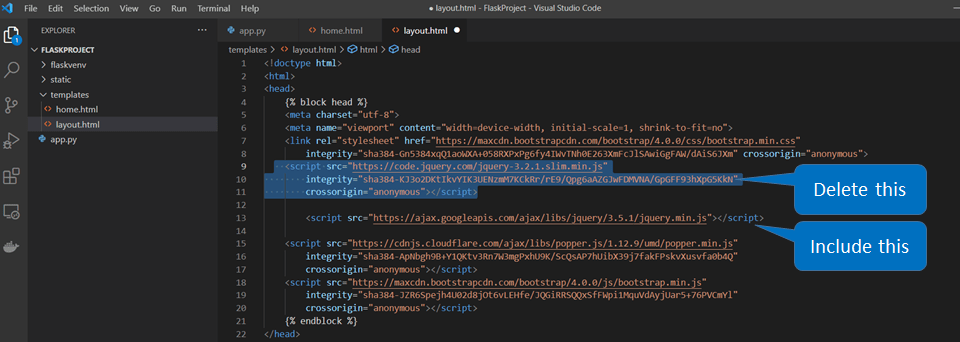
Create a layout.html file. will keep all common things in this page, like top navigation bar, footer section etc.
goto https://getbootstrap.com/docs/4.0/getting-started/introduction/

And copy the css and JS files and paste them to the layout.html page.

Layout Designing
Give some structure to the body section in the layout.html

Design the user input form page to get input from users to predict the house price
Now design Home.html which will accept user input for hose price prediction.

Now if you refresh the browser where the app is running you will see the below outcome:
Now lets create the form with input boxes to accept the inputs from the user as below:

Now add form inside column one that is col-md-8 These are the classes defined inside bootstrap css. Explore bootstrap a bit and you will get familiar with all those classes over the period.

Also create a placeholder in the second column to display the prediction result as below

After doing till here, if you again refresh the browser, you will see the below output:

Create an Ajax Request to send the form data to flask app
Now its time to create the Ajax request to send all the form data to the flask app.

Now to make Ajax work, you need to update the JQuery file in the layout page with the 3.5.1 version.
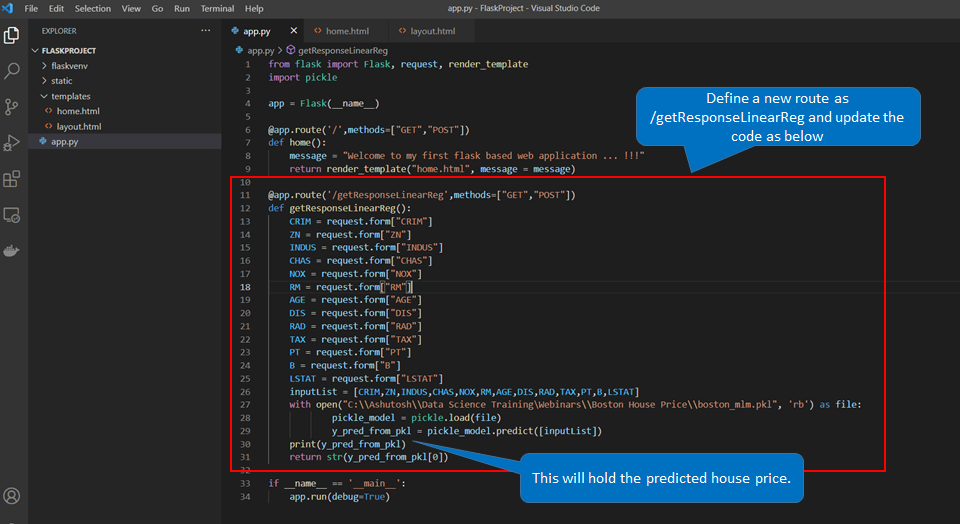
Now HTML page work is done. Next we need to go to the app.py file and load the saved linear regression trained model.
Load linear model build and saved in system
In this post we are not discussing on how to train the model. I assume you have already saved the trained model in your local system.
Now run the application using python app.py from the terminal and fill the input form and click predict. You will se the output as below:
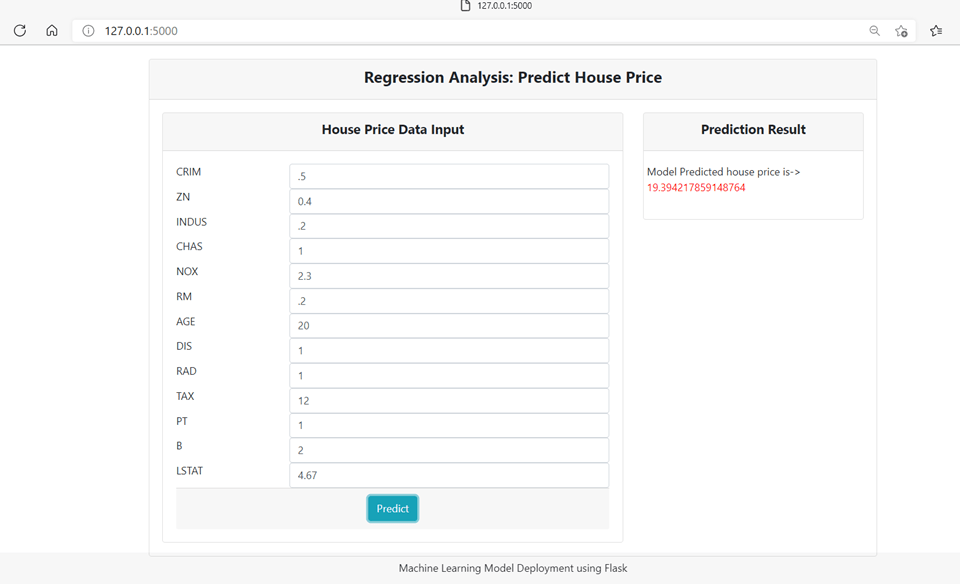
These are the dummy input values, you can put the actual values and analyze the output.
Now you see complete application is ready which does the prediction. You can take this and deploy in any cloud platform.
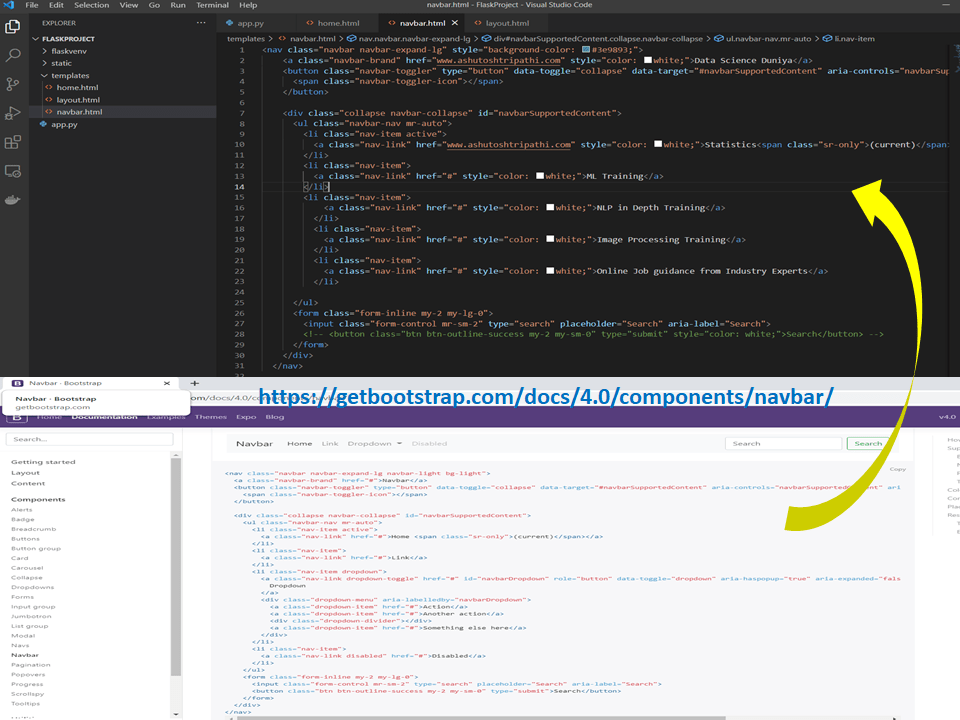
one last thing, we can also have some navbar at the top to complete the user interface. So simply create the navbar.html inside the templates folder and copy paste navbar code from the bootstrap and change the labels and href link accordingly.
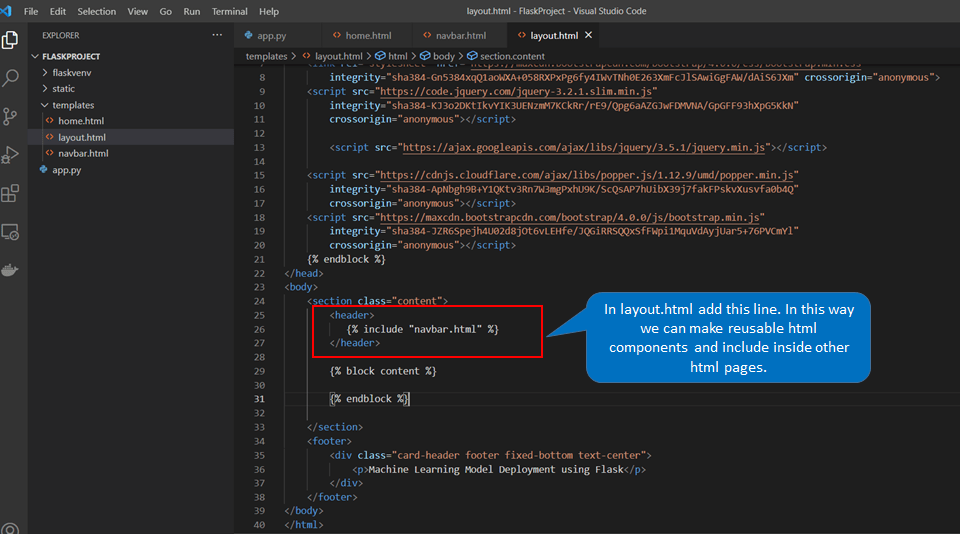
Now just go to your layout.html page and include this navbar.html as below:
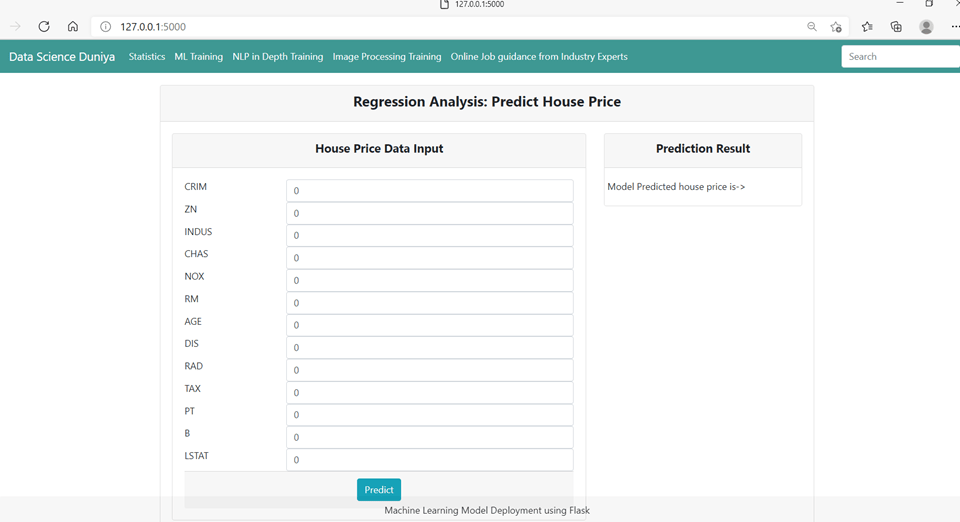
Now again do the refresh and you will see the below screen with the top navbars enables.
So this is all about Machine Learning Model Deployment using Flask. Hope you liked the article. Let me know your thoughts using the comment section below.
You can download the complete code from here:
Recommended Articles:
- Step by step guide to install VS Code on Windows
- How to install Python on windows
- What is Entropy and Information Gain? How they help to decide the Decision Tree Split
- What is Gini and Gini Index?
